May 23, 2022
The 9 Best WordPress Pricing Table Plugins in 2022
If you’re selling a product or service on your WordPress site, a beautiful and effective pricing table is e...
Facebook is a vital tool for ecommerce businesses (and indeed any online business). Facebook’s advertising tools, which millions of online businesses use to drive sales, are second to none in the digital marketing world, outside of maybe Google Ads.
The Facebook Pixel is a core part of how the Facebook Ads platform works. This is the analytics code that Facebook advertisers use to target certain groups of people with ad campaigns – such as people who previously interacted with their store or made a purchase.
You can’t advertise on Facebook without using the Facebook Pixel. Luckily, if your store is built on WordPress and WooCommerce, integrating the Pixel into your store is extremely easy. You don’t need any programming knowledge at all.
Read on, and we’ll explain just how you can add the Facebook Pixel to your WooCommerce website, as well as how to start using the Pixel and Facebook Ads to grow your sales.
Do you ever wonder why, as soon as you start looking into a topic online, you automatically start getting ads about that topic in your Facebook feed?
The Facebook Pixel is why.
The Facebook Pixel is what drives Facebook advertising. It lets advertisers show ads to people who have interacted with or visited their site.
It does this with a piece of code, installed on the advertiser’s site. This code tracks the user’s action (such as viewing a page, or clicking an element), and tries to match that to a Facebook profile.
The advertiser can then use this data to send specifically crafted ads, or create a specific audience for ad targeting based on events taken on their site.
Basically, the Facebook Pixel links the Facebook Ads platform with external sites, allowing much deeper targeting and conversion tracking for advertisers.
The exact details of how the Facebook Pixel is able to match an event taking place on your site to a user’s Facebook profile are a little technical. But in simple terms, it basically uses data stored on your browser or device to detect the user’s Facebook profile.
For example, if you’re used to being automatically logged on when you open Facebook, Facebook can probably match your profile to pixel events on another site.
While this may sound a little creepy, it’s really a win-win. Advertisers get to target the right people for their products, and Facebook users only see ads that are likely to be of interest to them.
All this data is heavily encrypted as well, so it’s basically impossible for your data to be leaked, or for advertisers to contact you personally based on Pixel data.
Advertisers can reach people based on demographics, interests, life events and more info from their Facebook profiles.
However, a more powerful and accurate method of targeting is to show ads to people who have taken certain actions on your website.
A person who has browsed a few pages on your store, or added an item to their cart but didn’t yet purchase, is much more likely to respond to one of your ads, than a random person who you think fits your audience persona.
The Facebook Pixel lets you do this. You can run what we call “retargeting” ads, targeting users who have interacted with you before, which traditionally have a much lower ad spend per conversion.
The Pixel also allows conversion tracking, which helps Facebook optimize your ad targeting, again lowering ad costs.
This means, when someone clicks on your ad and takes the action you want them to take (such as making a purchase), Facebook’s software can see this. Once you get a decent number of conversions, Facebook will automatically optimize your ads to show to the people who are (based on the Pixel’s data) most likely to result in a conversion.
Read more about Facebook’s ad delivery optimization system.
Highly focused targeting, Facebook conversion tracking and automatic ad optimization are incredibly powerful tools to have, and help you keep ad costs down a lot. It can be the difference between making a profit on your ads or making a loss.
So, for sites that rely on Facebook Ads to drive traffic to their store, using the Facebook Pixel is an absolute must. Even if you don’t plan to yet, it’s a good idea to install the Pixel on your website anyway, so it can start generating data that will help you if you ever do want to run ads.
There are a few ways you can add the Facebook Pixel to your WooCommerce site.
While the code may look a little intimidating for non-programmers, there are extremely simple methods you can use, that require just a point and click to set up.
Let’s look at your three options now.
You can set up a manual Facebook Pixel integration by simply pasting a code snippet into the header of your site.
You’ll need to go into Facebook Ads Manager, and find the Events Manager screen.
(If you’ve never touched Facebook Ads before, you may have to create a business account and a page for your brand first.)
Create your Facebook Pixel first. Give it a name, so you can identify it as the Pixel for your site.
Now Facebook will ask how you want to install the base Pixel code. If you want to do it manually, hit Install code manually.
Copy the base code shown, and paste it into your site’s code, between the <head> tags on any pages you want the Pixel to track.
To easily add it to every page on your site, either add it to your theme, or use a plugin like the Insert Headers and Footers plugin.
This will install the base code – which means the Pixel will track Page View events. To add more events to track, you’ll need to add a new line of code to your Pixel code for each event, or use the Facebook Event Setup Tool to help do this.
Facebook Pixel Tracking Standard Events
This is a list of all the predefined standard events set up for the Facebook Pixel. You can track these events by adding an extra line of code to your Facebook Pixel base code, or with a free plugin to install Facebook Pixel tracking.
Standard events:
Setting up the code manually is not the best option, as it’s easy to make a small mistake in the code, causing your Pixel to not work. It also takes more time to manually add code yourself.
It’s easier to use plugins to add the Pixel to your site and set up events for Facebook conversion tracking on WooCommerce.
Facebook offers a free plugin to connect and install the Pixel on your WooCommerce site. As well as installing the Pixel, this plugin tracks events like Lead, View Content, Add To Cart, Initiate Checkout and Purchase.
While this plugin is the official plugin from Facebook, the user reviews are not great, at 2.3 stars out of 5 on WordPress.org.
So, despite being Facebook’s official WooCommerce Facebook Pixel plugin, this is not the best option to install and manage the Pixel for your WooCommerce store.
Enter option three – a third-party WordPress plugin built to provide Facebook Pixel integration on WordPress and WooCommerce sites.
Pixel Cat does just this. It lets you install the Pixel, build events and set up custom triggers from the plugin dashboard, which takes away all the trickiness of copying and pasting code that often leads to little errors.
It integrates directly with WooCommerce, making it a great choice for e-commerce store owners on WordPress.
To add the Pixel to your site with Pixel Cat, just go to the “plugins” tab in your WordPress dashboard. Hit “Add New”, search “Pixel Cat”, and install and activate the free plugin.
Once you’ve activated the plugin, add your Pixel ID in the main page of the plugin’s dashboard, and hit “Save”.
Whichever method you choose to install the Facebook Pixel on your site, it’s a good idea to test and check it’s working as intended.
A small thing missing in the code can cause the entire thing to break, which can be a huge pain if you start running traffic to your site, thinking the Pixel has been tracking your users.
Once you’ve added the Pixel to your site, get the Google Chrome Facebook Pixel Helper extension. This is a simple browser extension that shows data about any Facebook Pixels installed and working on the page you’re viewing.
With this, checking your Pixel is very simple. Just go to a page where you want the Pixel to be working. Check the extension – if no Pixel is installed, the icon will be greyed out. Otherwise, it will be light blue, with a number indicating how many events are firing.
Click on the extension to view more details about which events are firing. You’ll usually see “PageView” or “ViewContent” here, to start with.
If you want to track more specific events, such as an event that fires after a time or scroll delay, or something like “Add to Cart” or “Purchase”, you can perform this event yourself, and check it shows up as you intended by clicking the Pixel Helper icon.
Pixel Cat’s WooCommerce integration is one of the reasons it offers so much value. This integration saves WooCommerce store owners a ton of time setting up the events you need to grow your store with Facebook Ads.
The integration works with just one click. In the plugin dashboard, go to the E-Commerce tab, and turn on “Track Shopping Events”.
This automatically tracks the events Add To Cart, Add Payment Info, Purchase, View Content, Search, and Add to Wishlist, along with relevant parameters.
Parameters are things like value, currency, and product name. These are particularly important for e-commerce stores, where you may want to retarget users who bought a certain product, or spent a certain amount.
The WooCommerce Facebook Pixel integration from Pixel Cat has two more powerful features for store owners: Advanced Matching and Dynamic Product Feeds.
Advanced Matching is a tool that helps match a higher number of Facebook Pixel events to Facebook users.
The Facebook Pixel doesn’t have a 100% success rate matching events to profiles. Whether a user is logged out of Facebook when they performed an event, was on an unfamiliar device, is blocking cookies, or any other reason, there will be a bit of a disparity between the number of events and the number attributed in Facebook.
For example, if you had 100 Add to Cart events, and wanted to retarget all these people with ads, your ads may only reach 70 profiles.
With Advanced Matching, the Pixel searches for additional information or metadata it can use to match events to profiles, resulting in a higher match rate.
Facebook’s help center claims Advanced Matching is proven to increase custom audience sizes, increase the number of attributed conversions, and decrease cost per conversion.
Learn more about Advanced Matching here.
The second advanced feature of Pixel Cat’s Facebook Pixel integration for WooCommerce is enabling product feeds for Dynamic Product Ads.
Dynamic Ads automatically customize your ads for different Facebook users. It uses your product catalog to create a number of variations, and automatically picks the best one to show.
Let’s say you had 15 different products, and wanted to show remarketing ads that promote a different product, based on what the user had looked at in your store.
Instead of needing to set up 15 different ads, Dynamic Ads automatically creates variations, and shows different variations based on data from the Facebook Pixel.
This is both powerful and time saving – all you need to do is add your WooCommerce product catalog link in Pixel Cat, and the plugin does the rest.
Learn more about Dynamic Product Ads.
Pixel Cat offers a range of other advantages, not limited to the robust WooCommerce integration.
It lets you create custom events, which are a powerful way to enable extremely focused retargeting ads, or track very specific conversion events.
You can also set up events with custom triggers, such as if you wanted it to fire after the user has been on the page for a certain amount of time, or scrolled a certain portion of the page.
Other trigger options include firing events when the user clicks on an element (such as a button), or even just hovers over it.
Pixel Cat also supports multiple Pixels, and has dedicated support, should you need any help getting set up.
Wondering how exactly installing the Facebook Pixel can help you grow your WooCommerce store?
It won’t grow your sales by itself. However, setting up the Pixel, along with all the basic shopping events, enables you to do some powerful things with Facebook Ads that will bring in more sales, and allow you to run more profitable ads.
Here are some ways you can utilize the Pixel:
Targeting cold audiences (people who have had no interaction with your business before) is tough and unpredictable. It’s much more effective to target people who know you already.
Retargeting ads are ads that show to people who already took an action on your site, such as viewing a page, adding an item to their cart, or making a purchase.
By tracking events with the Pixel, you can set up retargeting ads to capture additional revenue for your WooCommerce store.
For example, you can retarget people who made a purchase with ads for complementary products from your store.
You could also show ads to people who viewed a product but didn’t make a purchase. Give these people an extra push to buy.
97% of first-time visitors to your site will leave without buying anything. Retargeting ads are a fantastic way to capture a percentage of those people, who otherwise would never see your site again.
Tracking conversions is essential when you run ads. This is the only way you’re able to tell if your ads are having a positive impact.
Without conversion tracking, you could be spending more money on ads than the actual revenue that those ads create.
Setting up conversion events with the Facebook Pixel allows Facebook Ads Manager to report on this data, so you can see exactly what results you’re getting from your ad spend.
Additionally, one of the reasons Facebook Ads are so powerful is the conversion-optimized delivery system.
In simple terms, this means Facebook is able to determine which profiles are most likely to result in a conversion from your ad, based on past results. This leads to significantly better results – more conversions for less money. But it only works if the Facebook Pixel tracks your conversions and reports this data back to Facebook.
Custom audiences are specific groups of people you can use as targeting groups for your ads.
Very similar to what we talked about with retargeting ads, custom audiences generally produce better results than “cold” audiences built on demographics and interests.
While you can also create custom audiences with customer lists (like an email list), the Facebook Pixel allows you to build really effective audiences. You could create audiences for existing customers, people who visited your site but didn’t make a purchase yet, or people who had shown an interest in a specific product or product category.
Custom audiences built with the Facebook Pixel let you get super targeted with your ads, and drive the right people back to your WooCommerce store.
An extension of the custom audience is a lookalike audience.
While custom audiences help you get more from existing customers or fans, lookalike audiences are brilliant at increasing your reach, and bringing in new customers.
A lookalike audience uses Facebook’s software to reach people similar to those in your custom audience. This almost always works better than trying to come up with the right demographics, interests and behaviors to target by yourself. Lookalike audiences can result in cost reductions as much as 1/10th the cost of regular cold targeting.
To create a lookalike, just set your custom audience (for example, people who made a purchase from your store), then use that as a base for your lookalike audience. You can choose how broad your lookalike audience should be, as well as layer interest/behavior/demographic targeting on top of the lookalike.
If you haven’t run any Facebook Ads before, setting it up the first time can be daunting. There’s a lot to learn. But it’s worth the investment, as Facebook Ads are vital for driving the traffic your store needs to thrive.
If you’re new, start small. Set up a simple retargeting ad. This is a good way to avoid heavy losses by targeting the wrong audiences, learn the Facebook Ads platform, and drive a nice bump in sales to your WooCommerce site.
Let’s walk through setting up your ad now.
If you haven’t already, you’ll need some things in place before you start running Facebook Ads.
You’ll want to create a Facebook Business Manager account to manage your ads. Once you’ve got this set up, create an ad account for your business (you can have multiple ad accounts managed inside the same Business Manager account).
Go to business.facebook.com to get started.
You’ll also need a Facebook page for your store. Open the Facebook menu and go to Create > Page to set this up.

You don’t need to add too much to your Facebook page for now, but make sure it looks like your store is a real and trustworthy business.
Now we can move on to setting up your retargeting ad.
First, make sure your Pixel is installed, set up, and firing.
Follow the instructions we laid out earlier to set up the Pixel with Pixel Cat.
Then, make sure the WooCommerce integration is turned on, so you’re automatically tracking shopping events.
It’s best to set the Pixel up early, so it has time to gather data before you start running your ad. Otherwise, it may take a little while before your ads can start to be effective.
Once this is all set up, we can move on to setting up an ad.
Now you’ll need to create a Campaign.
Go to Facebook Ads Manager > Campaigns > Create.
The first thing you’ll do when creating your campaign is to select a campaign objective. This is what the goal of your campaign is.
If your ad is meant to drive sales, select Conversions.

After choosing your campaign objective, name your campaign, leave all other settings as they are, and hit Next.
Next up is creating an Ad Set.
One campaign can have multiple ad sets. The ad set covers targeting, as well as settings like budget and placements.
So, if you wanted to test different audiences against each other, you’d test by creating several ad sets.
For this, we’ll just worry about making one ad set. Let’s run through the settings of your ad set.
For the Conversion Event Location, choose Website, as that’s where a conversion (ie a purchase) will take place.
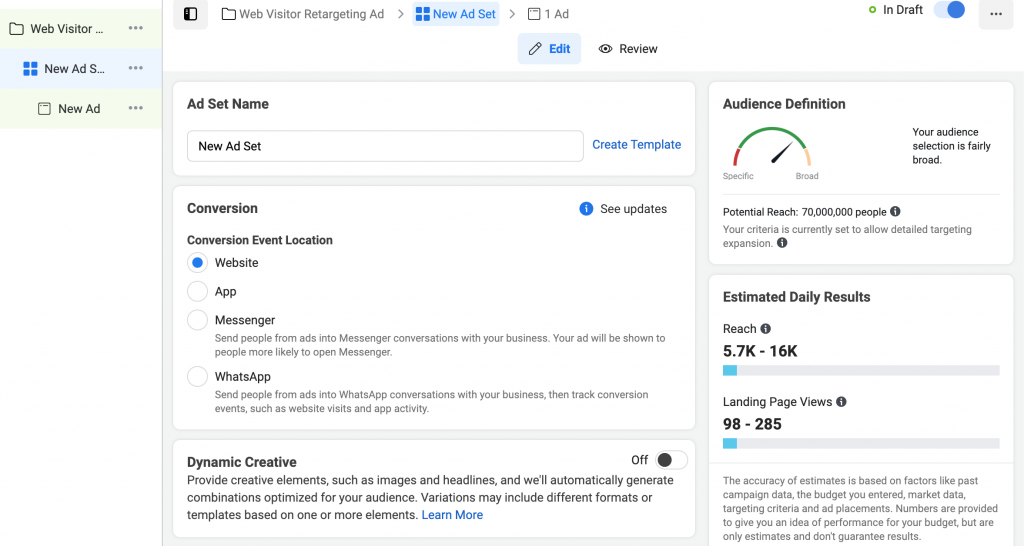
The Budget & Schedule is up to you – choose a budget that you’re comfortable with spending.
The Audience is the most important part here. This is where you’ll choose the people you want to show ads to.
Select Create New Audience. Hit Create New > Custom Audience.
For the audience source, choose Website.

Hit Next.
Include All website visitors, using your Pixel as the source. If you want to refine it further, you could choose People who visited specific web pages, and restrict this to people who viewed product pages, or some other high-intent area of your site.
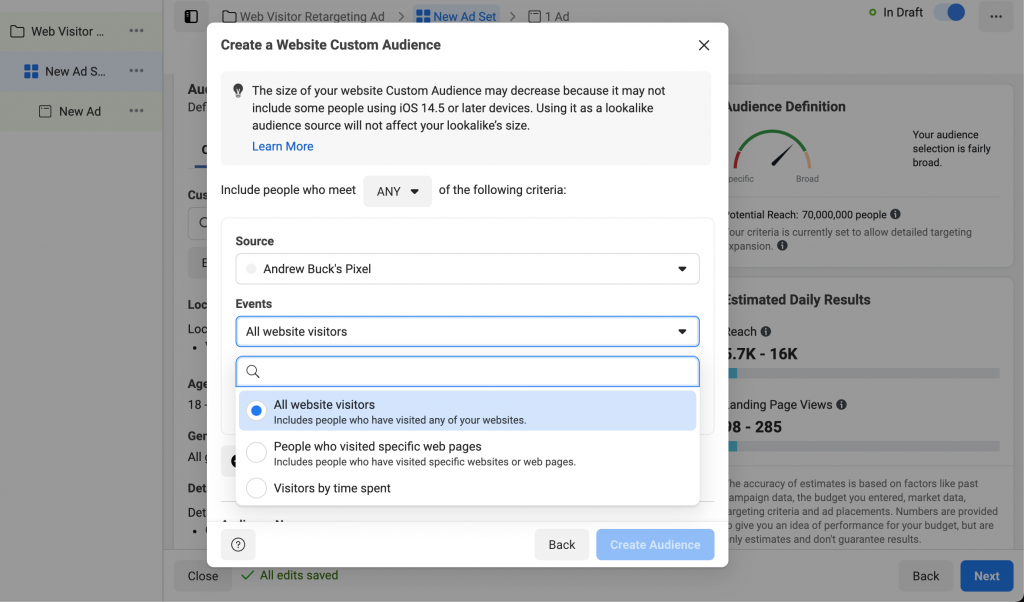
You can keep the Retention setting as 30 days, increase it, or decrease it, depending on how much traffic you get. This setting means how long people stay in your audience after performing the event. 30 days means you will target people who viewed your site in the last 30 days.
Now, hit Exclude People. Select the Events dropdown, and choose Purchase.
Keep the retention setting the same.
Name the audience something recognizable, like “retargeting site visitors”, and hit Create Audience.
This will give you an audience of people who viewed your site in the last 30 days, but did not make a purchase in the last 30 days.
You can add more layers on top of that if you wish (such as only targeting men or women, restricting to an age group, or showing ads in certain locations or languages).
If this isn’t relevant, we can move on.
Keep placements as Automatic Placements.
Under Optimization & Delivery, you’ll want to optimize for Conversions.
If the Facbook Pixel doesn’t have enough data yet, you won’t be able to choose this. So you may need to start by optimizing for Landing Page Views.
Once you get some conversions for the Pixel to pick up on, you can edit your ad and change this.

Hit Next to move on.
The final step is creating your Ad.
One ad set can have many ads. It can also have just one.
You would create more than one ad if you want to test creative elements (such as images or copywriting) against each other, by creating different ads, served to the same audience.
You could also create multiple ads to drive traffic to different products in your WooCommerce store.
Setting up your ad is fairly straightforward. You just need to add media, write something to go with it, and select the destination for when someone clicks on your ad.
Let’s run through it quickly.
Under Identity, select your store’s Facebook page (you can also select an Instagram account, if you have one and want to run ads on Instagram too).

Under Ad Setup, keep it basic with Single Image or Video. Later you may want to experiment with carousel ads, though (this is something you can test with multiple ads).
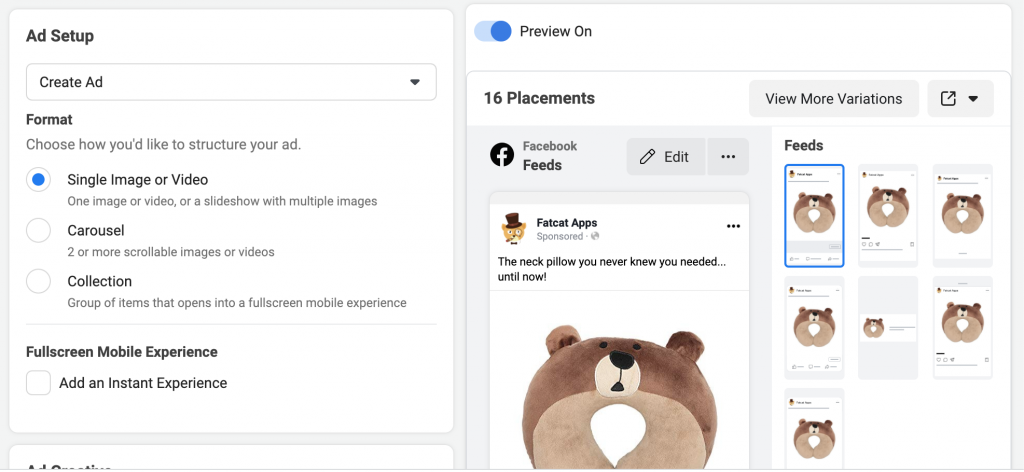
Under Ad Creative, you’ll add your media and write your copy. Start with a simple single image – choose the best quality image of the product you want to promote.

Write some text to go with your ad. Keep this short and snappy, while conveying a few points that say why the person should buy your product.
For the Destination, select Website, and paste the URL of the product you are promoting.
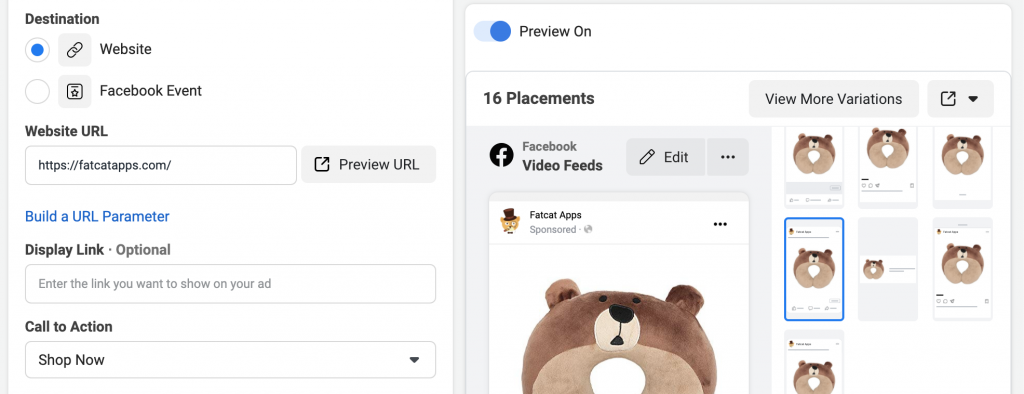
Finally, choose a Call to Action for your ad. Shop Now should fit for most WooCommerce stores.
Take a look at your ad, double check the copywriting, and hit Publish to finish.
Once your ad is approved, it will start running in accordance with the budget and schedule you’ve set up.
This was a basic walkthrough on how to set up your first ad for your WooCommerce store. Going forward, you’ll want to test different audiences, different creative elements, and promote different products, to see what delivers the best results.
Testing takes a bit more of an investment, but it’s worth it, to increase the effectiveness of your ads.
Testing is the most reliable way to increase the amount of sales you get from your ads, and cut down the money you need to spend to get each sale.
Additionally, make sure you track the cost per conversion you’re getting from your ads. If you’re spending more money per sale than you’re actually making from the sale, you’ll need to change something, otherwise you’ll just lose money in the long run.
This has been the complete guide to installing the Facebook Pixel and utilizing Facebook for WooCommerce store owners.
Facebook Ads are a powerful tool for you to grow your WooCommerce store. It takes a bit of time to learn and master, but the platform is one of the best out there for generating new sales and customers.
Whether you’re about to start Facebook Ads now, or considering it in the future, it’s a good idea to get the Facebook Pixel installed and running on your site as soon as possible.
The sooner you get the Pixel installed, the more data it will be able to collect, and the more effective it will be once you decide to start running ads.
The Pixel can seem tricky to get your head around if you look at the code itself, but installing it and getting it set up is simple with a plugin like Pixel Cat.
Pixel Cat takes care of all the complicated code of the Facebook Pixel, so all you need to do is add your Pixel ID and set up which events to track. It takes just minutes to get the Pixel up and running on your WooCommerce site.

May 23, 2022
If you’re selling a product or service on your WordPress site, a beautiful and effective pricing table is e...

May 23, 2022
Bottom Line: for the best WordPress opt-in plugin for functionality, ease of use, and site speed, check out O...

June 21, 2021
There are some pretty awesome tools out there for building WordPress websites. One of the best is Elementor &...